Have you ever had your morning routine disrupted by a malfunctioning toaster? We’ve all been there – the frustration of waiting for your toast to come out perfectly golden, only to be met with a cold, uncooked slice of bread. In this article, we will explore some simple troubleshooting techniques to help you diagnose and fix common issues with your toaster, so you can enjoy that perfect slice of toast every morning without fail.
Troubleshooting Techniques for a Faulty Toaster
Is your trusty toaster giving you a hard time lately? Don’t worry, we’re here to help you troubleshoot and fix the problem. In this article, we’ll guide you through various techniques to identify and resolve the most common issues that can arise with a malfunctioning toaster.
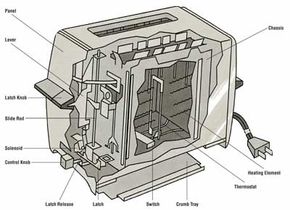
This image is property of guide-images.cdn.ifixit.com.
1. Check Power Supply
1.1 Plug into a Different Outlet
The first step in troubleshooting your toaster is to ensure it is receiving an adequate power supply. Sometimes, the outlet you are using may not be delivering enough power, causing the toaster to underperform or not work at all. To rule out this possibility, try plugging the toaster into a different outlet in your home.
1.2 Test the Outlet
If plugging into a different outlet doesn’t solve the issue, the next step is to test the outlet itself. Use another electronic device that you know is working correctly and plug it into the same outlet. If the device operates normally, you can cross off the outlet as the source of the problem.
1.3 Check the Power Cord
A faulty power cord can be the culprit behind a malfunctioning toaster. Inspect the power cord for any signs of damage such as frayed wires or loose connections. If you notice any issues, it’s best to replace the power cord to ensure safe and reliable operation.
2. Verify Toast Setting and Timer
2.1 Adjust the Toast Setting
Sometimes, the issue with your toaster may be as simple as an incorrect toast setting. Check the dial or buttons that control the toast setting and ensure they are set to the desired level. Adjust the setting as needed and test the toaster again.
2.2 Reset the Timer
If the toaster’s timer is not functioning properly, it can affect the toasting process. Reset the timer by turning it to the lowest setting, then gradually increase it to your desired toasting time. This may help resolve any timer-related issues and improve the overall performance of your toaster.
2.3 Test with Different Settings
To further troubleshoot your toaster, try experimenting with different toast settings. Toast a slice of bread using different settings to see if the toaster produces the desired result. If certain settings consistently yield unsatisfactory toasting, it may indicate a more specific problem with your toaster that needs further attention.
3. Inspect Heating Elements
3.1 Visual Inspection
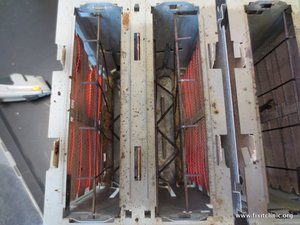
Inspect the heating elements of your toaster for any visible signs of damage or wear. Heating elements are responsible for producing the heat needed to toast your bread evenly. Look out for any broken or loose elements, discoloration, or burnt spots. If you notice any abnormalities, it’s best to proceed to the next step.
3.2 Test Heating Elements with a Multimeter
If a visual inspection doesn’t reveal any issues, you can use a multimeter to test the heating elements for continuity. Set the multimeter to the resistance mode and touch the probes to the heating elements. A reading of zero or very low resistance indicates that the elements are intact and functioning properly. If the resistance is infinite or significantly high, it’s likely that the heating elements are faulty and need to be replaced.
3.3 Check for Discoloration or Damage
Apart from the heating elements, check for any other parts of the toaster that may show signs of discoloration or damage, such as loose wires or contacts. Discoloration or burnt spots can suggest excessive heat or electrical problems. If you find any such issues, it’s recommended to have a professional inspect and repair your toaster to ensure safety and optimum performance.
4. Clean the Toaster
4.1 Remove Crumbs and Debris
Over time, crumbs and debris can accumulate inside your toaster and affect its performance. To resolve this, unplug the toaster and remove the crumb tray or, if possible, flip it upside down over a trash bin to remove any loose crumbs. Use a soft brush or cloth to gently clean the interior and remove any remaining debris.
4.2 Clean the Interior
After removing the crumbs, it’s essential to clean the interior of the toaster thoroughly. You can use a damp cloth or sponge to wipe away any residue on the heating elements, walls, and other surfaces. Be careful not to wet any electrical components and ensure the toaster is completely dry before plugging it in again.
4.3 Clean the Exterior
Don’t forget to give the exterior of your toaster some love too. Wipe down the exterior surfaces with a damp cloth or mild cleaning solution to remove any dirt, grime, or stains. Make sure to dry the toaster thoroughly before reconnecting it to the power supply.
4.4 Check for Moisture
Before using your toaster again, check for any residual moisture. Moisture in electrical appliances can lead to short circuits or other damage. Inspect the interior and exterior of the toaster carefully to ensure it is completely dry. Only plug in the toaster once you are confident it is moisture-free.
This image is property of media.hswstatic.com.
5. Check for Mechanical Issues
5.1 Check the Lever or Button
If your toaster has a lever or button to lower and raise the bread, ensure it moves smoothly without any resistance or sticking. A malfunctioning lever or button can prevent the toaster from properly engaging with the bread, resulting in uneven or inadequate toasting. If you encounter any issues, consult the user manual or consider seeking professional assistance.
5.2 Examine the Spring Mechanism
The spring mechanism is responsible for holding the bread in place and popping it up when finished. Inspect the spring mechanism for any signs of damage, stiffness, or misalignment. If the spring appears worn out or misaligned, it may need adjustment or replacement. Contact the manufacturer or a professional technician for assistance with repairing or replacing the spring mechanism.
5.3 Inspect the Toasting Slots
Carefully examine the toasting slots for any foreign objects or debris that may be obstructing the bread from properly entering or exiting the toaster. If you find any obstructions, remove them gently using a wooden or plastic object, while ensuring the toaster is unplugged. Always exercise caution to prevent damage to the toaster or injury.
5.4 Look for Loose Connections
Loose connections within the toaster can cause intermittent issues or unpredictable performance. Inspect the internal connections and wiring for any signs of looseness, corrosion, or disconnection. If you are uncomfortable working with electrical components, it’s best to seek professional assistance to avoid any risks.
6. Test the Thermostat
6.1 Monitor the Temperature
To determine if the thermostat in your toaster is functioning correctly, monitor the toasting process and verify if the toaster reaches and maintains the desired temperature throughout. Inconsistent temperatures or a failure to reach the desired level can indicate a faulty thermostat.
6.2 Use a Thermometer
For a more accurate assessment, you can use an external thermometer to measure the temperature inside your toaster. Simply place the thermometer inside the toaster while it is in operation and compare the readings to the desired temperature range mentioned in the user manual. If there are significant discrepancies, it’s advisable to replace the thermostat.
6.3 Replace the Thermostat
If you suspect that the thermostat is responsible for the malfunction, replacing it may be necessary. Consult the user manual or contact the manufacturer for information on the correct replacement thermostat and instructions on how to replace it safely. Alternatively, you can seek assistance from a professional technician to ensure the proper installation of the new thermostat.

This image is property of i.ytimg.com.
7. Examine the Control Board
7.1 Assess for Burnt Components
Some newer toaster models may feature a control board that regulates various functions. If your toaster has a control board, visually inspect it for any burnt components or signs of damage. Burnt components on the control board can indicate electrical failures and may require professional repair or replacement of the entire control board.
7.2 Test Functionality
If your toaster has a control board, there may be diagnostic tests you can perform to check its functionality. Refer to the user manual to understand the specific procedures for testing the control board and follow the instructions provided. If the control board fails any tests, it may need to be repaired or replaced by the manufacturer or a professional technician.
7.3 Seek Professional Repair
Repairing or replacing a control board can be a complex task, best left to professionals. If you are unsure about performing any repairs on the control board, it’s recommended to contact the manufacturer or seek assistance from a qualified technician to avoid any potential damage to the toaster or risk of injury.
8. Reset Safety Features
8.1 Check the Overheat Sensor
Toasters are equipped with safety features, such as overheat sensors, to prevent damage or fire hazards. If your toaster stops working unexpectedly or fails to heat up properly, an activated overheat sensor may be to blame. Locate the overheat sensor, usually a small button or switch, and ensure it is not tripped. If it is, press the button to reset it and test the toaster again.
8.2 Reset and Test Safety Mechanisms
In addition to the overheat sensor, your toaster may have other safety mechanisms like auto shut-off or anti-jam features. If you encounter any issues related to these safety mechanisms, refer to the user manual for instructions on how to reset or troubleshoot them. Following the recommended steps can help resolve the problem and ensure the safe operation of your toaster.
This image is property of guide-images.cdn.ifixit.com.
9. Consult the User Manual
9.1 Understand Troubleshooting Guidance
The user manual is an invaluable resource when troubleshooting your toaster. It often contains troubleshooting guides specific to your toaster model, providing step-by-step instructions to diagnose and resolve common issues. Take the time to read and understand the troubleshooting guidance provided in the manual to ensure you are following the manufacturer’s recommended solutions.
9.2 Follow Recommended Solutions
When following the troubleshooting guidance in the user manual, it’s crucial to adhere to the recommended solutions. Deviating from the recommended steps or attempting unfamiliar repairs may void the warranty or pose a safety risk. If the suggested solutions fail to fix the problem, consider reaching out to customer support or seeking professional assistance.
10. Contact Customer Support or a Professional
10.1 Reach Out to the Manufacturer
If all else fails and your toaster is still not performing optimally, it’s time to reach out to the manufacturer’s customer support. Contact them using the provided helpline or through their website and explain the issues you are experiencing. The manufacturer’s customer support team will be equipped to provide further guidance, recommend authorized service centers, or assist with warranty claims if applicable.
10.2 Seek Assistance from a Technician
In more complex cases, it may be necessary to seek assistance from a qualified technician. They have the expertise and tools to diagnose and repair toaster issues effectively and safely. Look for reputable appliance repair services in your area or contact the manufacturer for a list of authorized technicians trained to work on their specific toaster models.
By following the troubleshooting techniques outlined in this article, you can increase the chances of identifying and resolving the issues with your malfunctioning toaster. Remember to prioritize safety and consult professional assistance when necessary. With a little patience and the right approach, you’ll soon have your toaster working flawlessly once again!

This image is property of i.ytimg.com.


